How to install micropython on an ESP32 board
In this article I will show you how to install MicroPython on a Espressif ESP32 microcontroller board. I recently received an ESP32 board and have been itching to try out MicroPython on it. I am documenting the process here and hopefully you will find some value in this guide.
Prerequisites
Software
I am performing these steps on a Windows 10 laptop but the steps are similar on Linux. You will need python installed to follow along, I have installed the Anaconda distribution of python.
Hardware
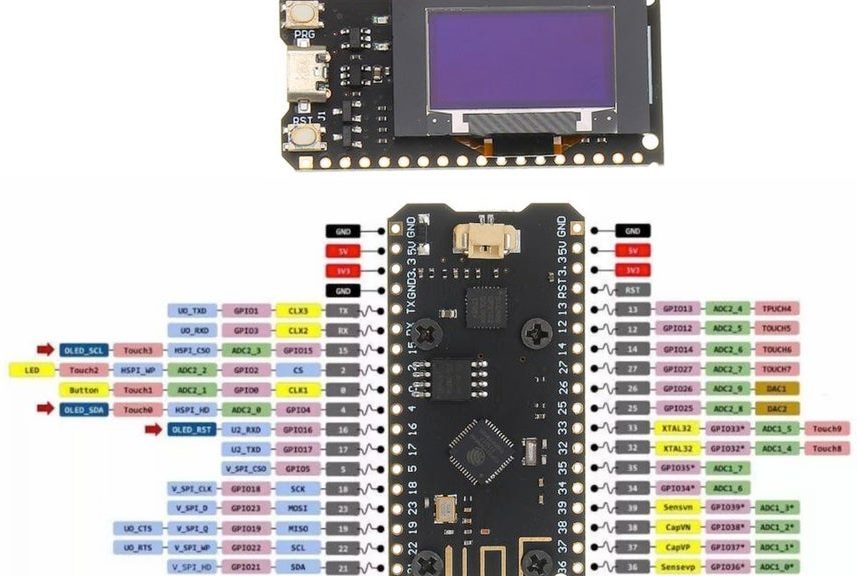
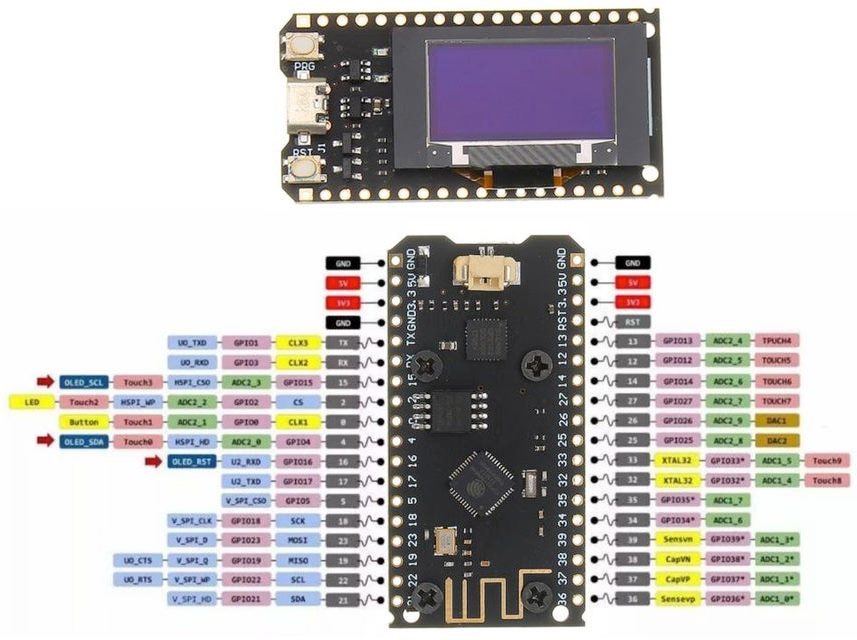
For this tutorial I am working with an ESP32 DEV board with an attached OLED display. This device arrived in Hackerbox 0044, here is a picture of the board and the block diagram. You can pickup a similar board on Amazon.com for under $20 USD.
Find a similar ESP32 boards on Amazon.com
Install pip dependencies
We will need esptool to flash the MicroPython firmware onto our device. The rshell module will allows us to connect to the micropython repl over USB.
pip install esptool rshellDownload MicroPython Firmware
Visit https://micropython.org/download#esp32 and download the correct firmware file for your board.
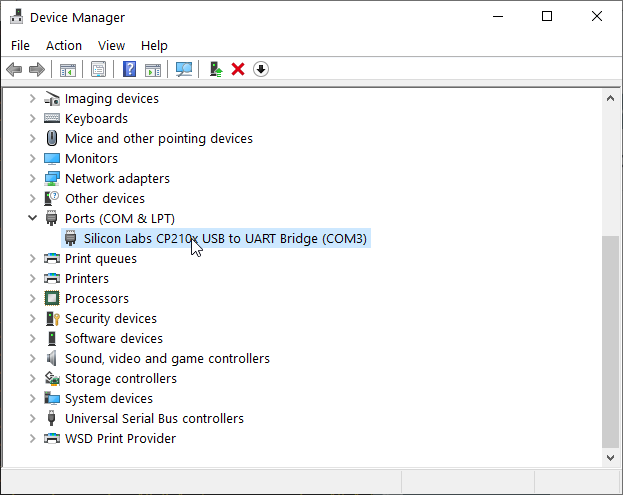
Connect the device via USB and determine the assigned COM port
- Connect the microcontroller to your laptop with a Micro USB cable
- Open Device Manage and expand “Ports (COM & LPT)“
- Take note of the port number, in my case the board was detected as COM3
Erase the device’s flash and write the MicroPython firmware
Note: Some ESP32 boards need to be placed in bootloader mode prior to flashing with new firmware. Read this page if you cannot flash the firmware using the commands below.
Before we write the new firmware we want to erase the flash memory of the device.
esptool --chip esp32 --port COM3 erase_flashNow we are ready to write the MicroPython firmware to the device. After a successful flash the device will reboot and be ready for us to write our first MicroPython program.
esptool --chip esp32 --port COM3 --baud 460800 write_flash -z 0x1000 esp32spiram-20190529-v1.11.binC:\Dev\micropython> esptool --chip esp32 --port COM3 --baud 460800 write_flash -z 0x1000 esp32spiram-20190529-v1.11.bin
esptool.py v2.6
Serial port COM3
Connecting........_
Chip is ESP32D0WDQ6 (revision 1)
Features: WiFi, BT, Dual Core, 240MHz, VRef calibration in efuse, Coding Scheme None
MAC: 3c:71:bf:f0:50:44
Uploading stub...
Running stub...
Stub running...
Changing baud rate to 460800
Changed.
Configuring flash size...
Auto-detected Flash size: 16MB
Flash params set to 0x0240
Compressed 1221600 bytes to 743973...
Wrote 1221600 bytes (743973 compressed) at 0x00001000 in 18.4 seconds (effective 531.8 kbit/s)...
Hash of data verified.
Leaving...
Hard resetting via RTS pin...Connect to the micropython repl using rshell
rshell -p COM3 repl
C:\Dev\micropython> rshell -p COM3 repl
Using buffer-size of 32
Connecting to COM3 (buffer-size 32)...
Trying to connect to REPL  connected
Testing if ubinascii.unhexlify exists ... Y
Retrieving root directories ... /boot.py/
Setting time ... Jul 07, 2019 17:16:43
Evaluating board_name ... pyboard
Retrieving time epoch ... Jan 01, 2000
Entering REPL. Use Control-X to exit.
>
MicroPython v1.11 on 2019-05-29; ESP32 module with ESP32
Type "help()" for more information.
>>>
There it is! We are up and running with MicroPython on our ESP32 board. Now lets explore with the Python repl.
MicroPython basic commands
Here are some commands to get you going with MicroPython
>>> help()
List all available python modules that can be imported
>>> help(“modules”)
Import the machine module and list available methods. Issue a command to reboot the ESP32.
>>> import machine
>>> help(machine)
>>> machine.reset()
Import the ESP32 module and get the temperature of the CPU
>>> import esp32
>>> esp32.raw_temperature()
118
Import the uos module and list the files on disk.
>>> import uos
>>> uos.listdir()
[‘boot.py’]
When you are ready to exit the repl press CTRL+X
Stay tuned for more MicroPython Tutorials where we will walk through connecting to WiFi and setting up the WebRepl. I hope you have found this article useful if you run into issues leave a comment below and I will try to help you out. Later!
