Install Kali Linux as a VirtualBox VM
This is a step-by-step guide on how to install Kali Linux as VirtualBox VM on Windows 10. Kali Linux is a popular Linux distribution that comes bundled with many security tools. Kali Linux is considered an essential tools by penetration testers, security researchers and infosec professionals.
This specific guide includes instructions to install Kali Linux as a Oracle VirtualBox VM on Windows 10. The included screenshots are from installing Kali Linux 2018.4 on a Windows 10 Pro 1809 machine with VirtualBox 5.2.x installed, you may encounter different screens if your operating system is Windows 7 or a Linux OS.
Prerequisites
I’m going to assume that you have already installed Oracle VirtualBox and have at least 15GB of free space (although 32GB is recommended by Kali). A fast internet connection is recommended to download the 3GB iso and install package updates(~1.7GB).
Download the Kali Linux iso image
Download the Kali Linux iso from https://www.kali.org/downloads/. There are two distinct versions to choose from, Kali Linux Full (3GB file) and Kali Linux Lite (870MB file). If you are wanting to just trying it our and exploring I recommend downloading the Full Image. It’s also the best choice for using it in LiveCD mode. In fact, if you choose the Lite image you can still use all of the tools but you must install them first using apt install.
Note: If you are running VirtualBox 6.x, it no longer supports running 32bit operating systems. Make sure you download the 64bit version of Kali.
Create a new Virtual Machine
Time needed: 3 minutes
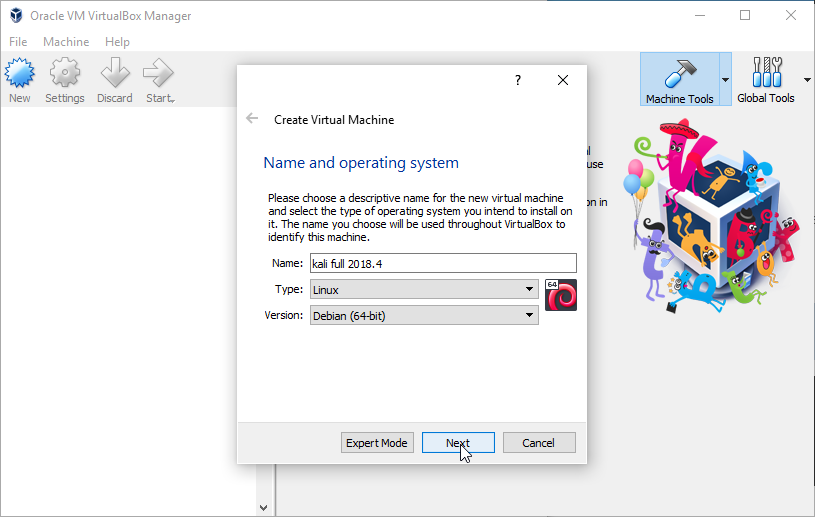
- Launch VirtualBox Manager and click New
Give your new VM a descriptive name, change Type to Linux and Version to Debian (64-bit). Click Next

- Select the amount of memory for your VM & create a VDI disk
I specified 2GB of RAM which is more than the minimum but not by much. Kali is responsive with 2GB but if you plan to use some of the heavier tools like Metasploit, 8GB is best.
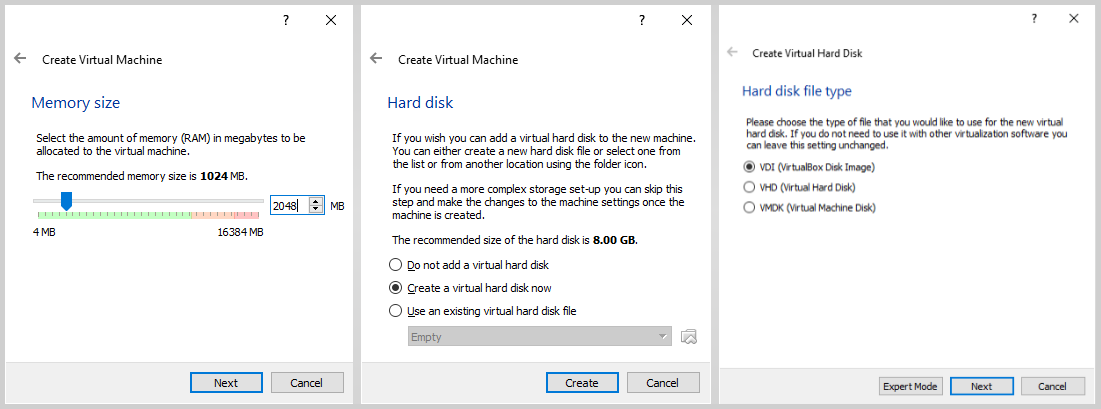

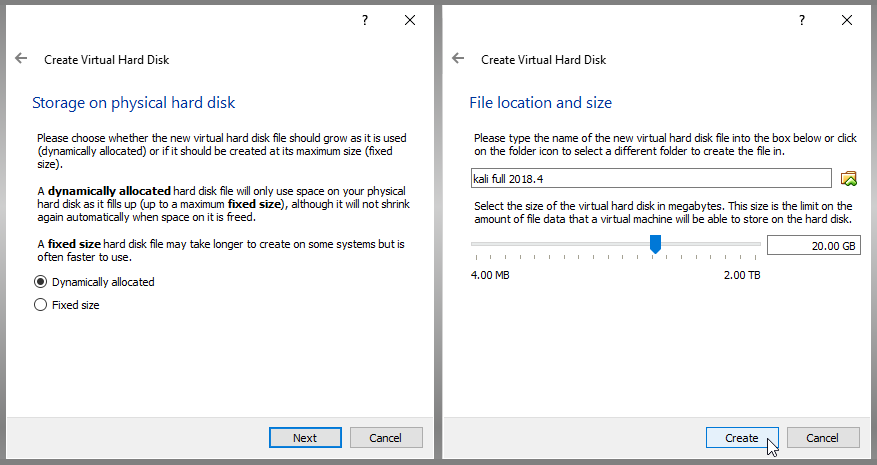
- Create a dynamically allocated disk and specify the size.
I used the Kali recommended 20GB. If you plan on performing high traffic packet captures you will want to increase the size.

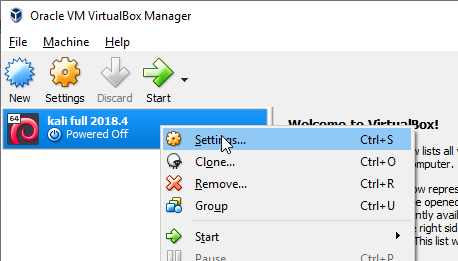
- Right click on the new VM and choose Settings
In the next two steps we will need to attach the Kali iso image and make some changes to the network adapter.

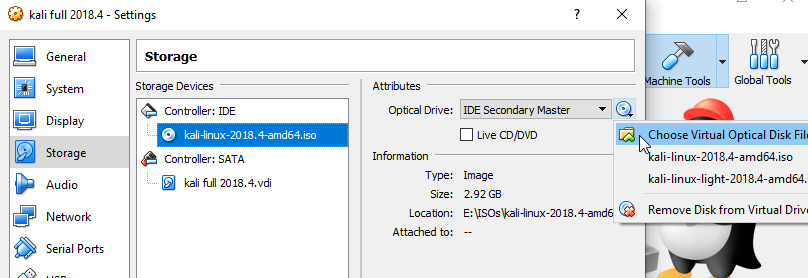
- Navigate to the Storage section and attach the iso file.
Choose the CD-Rom device, click the small CD icon to the far right and browse to the downloaded iso file. This will allow our VM to boot Kali from the virtual cd (iso image file).

- Navigate to the Network section make the following changes
On the Adapter 1 tab change Attached to to NAT. This will be our typical network adapter with internet access.
TODO Redo Screenshot - Setup Adapter 2 in Bridged Promiscuous Mode
On the Adapter 2 tab change Attached to to Bridged Adapter. Next, choose either your Wired or Wireless Adapter from the list. Finally, click Advanced and change Promiscuous Mode to Allow All. This will be our packet capture interface used by tools like Wireshark and Snort.
TODO Redo Screenshot
Boot from iso & run the Installer
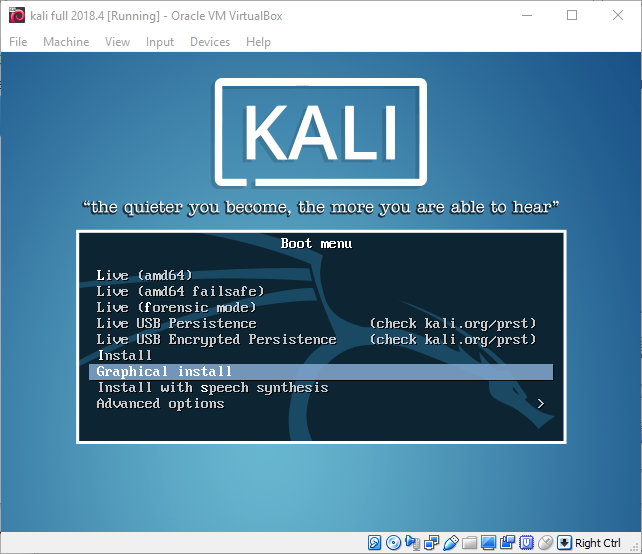
Now that we have preconfigured our VM, we are ready to start it and begin the Kali Installer. At the boot screen arrow down and choose Graphical Installer.
The installation steps are very similar to most Linux operating systems so I will not go through each and every install screen here in this article. Beside, the Kali documentation has a detailed installer guide with screenshots of every step in case you get stuck.
...waiting for you to install Kali… 🙄
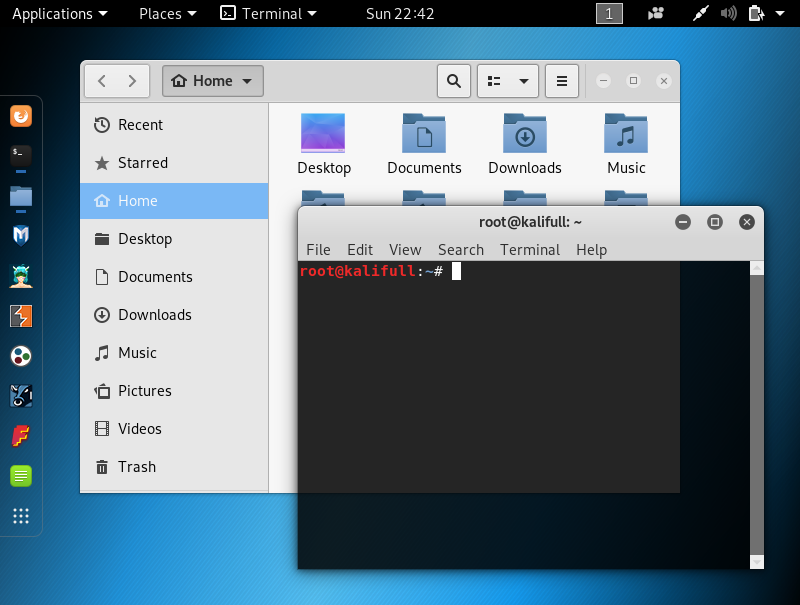
Welcome, back! Hopefully everything went smooth and you should now be up and running with a graphic desktop like this one.

Install Package Updates
The first thing we want to do is install any available software updates. To do this launch a shell and run the following commands.
apt update
apt upgrade -y
After all of the software upgrade are installed, reboot the system.
rebootOne final cleanup step is to remove the packages that are no longer needed and delete the apt cache files. So, open the shell again and issue these two commands.
apt autoremove
apt-get autoclean
Change the Display Resolution
Before we dive into any of the tools there are a few customization we want to make. The first thing you will notice after logging into your new machine is that screen space is a little cramped. This is because our screen resolution starts our at 800×600.
Note: The following steps may note be required because modern versions of Kali have guest additions preinstalled. If so, you can change the screen resolution by simply resizing the VM window.
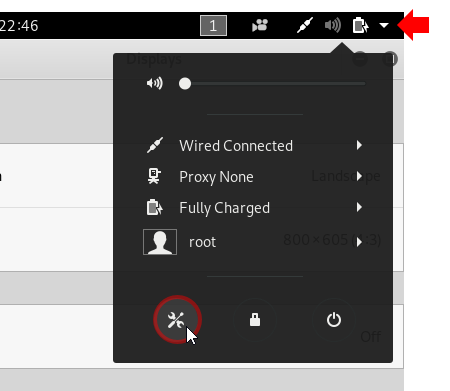
Let’s increase the screen resolutions so we have more room to work. To change the screen resolution click the small down arrow in the top right of the screen and click the Settings icon.
Next, on the left of the Settings windows scroll down and choose Device and then Display. Change the dropdown to a larger, desired resolution. For example, 1440×900 fits nicely on my 1080p laptop screen.
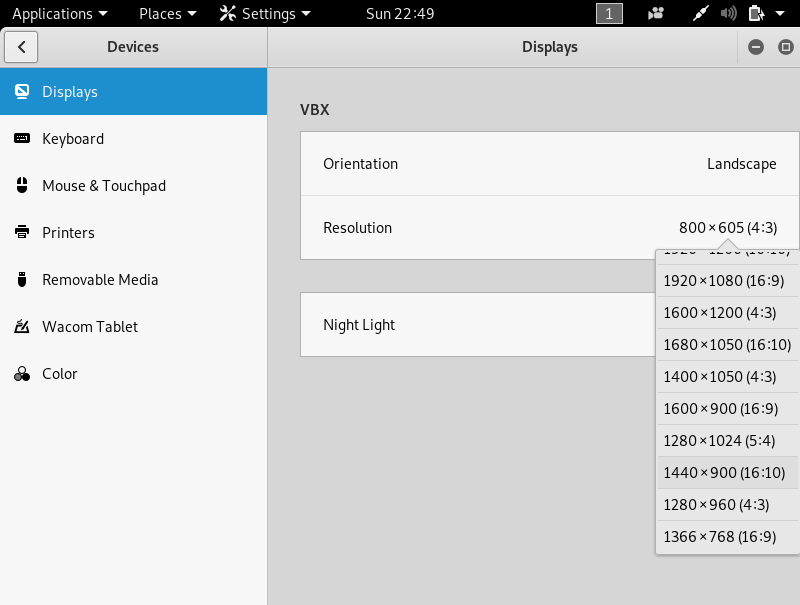
Once you have chosen a new resolution click the blue Apply button in the top right of the window, my button was partially of the screen. Ah yes, now we have more room to work with Kali.
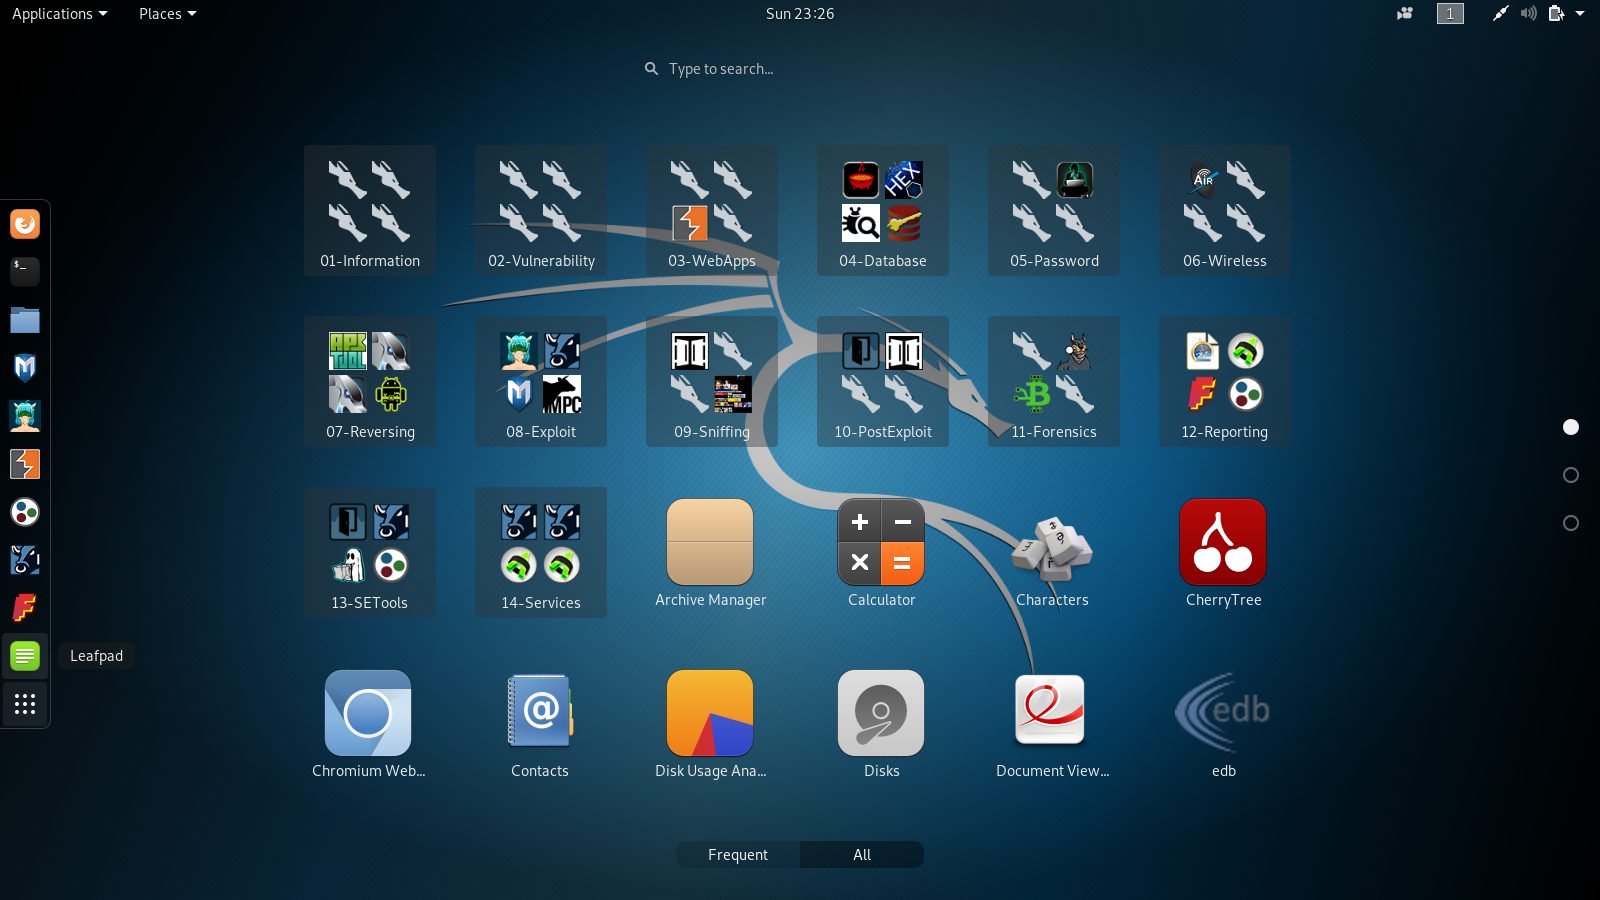
Lets Explore some of the Tools
TODO: This section of the article is a work in progress.
Conclusion
Let’s review what we learned today. Kali is a popular Pentesting tool delivered as a bootable Linux Distrubtion. We learned how to Install Kali as a VirtualBox VM. Finally, we looked at some of the more tools included in Kali Linux.
Did I leave anything out? Use the comments section below to ask a question and leave feedback. If you found this tutorial useful please share it on Twitter, Facebook, or Reddit.
Also, consider checking out some of my other Linux Tutorials and Articles.
Kali Linux FAQs
The latest version is Kali Linux 2019.2, released on March 4th, 2019. It is based on Kernel 4.18.0 and GNOME 3.30.1.
In this tutorial we installed the Full version of Kali Linux, it’s the best choice if you are just getting started. Additionally, it also offers the best LiveCD experience.
Choose the Lite version when you just need to use one or two specific tools or when hard drive space is limited.
Here are some of the more popular tools that are included with Kali…
Metasploit Framework, Nmap, Aircrack-ng, John the Ripper, Snort, WireShark.
There are over 400 security tools in the Kali repos, a complete list of tools can be found here.
It is based on Debian Testing.
Username: root
Password: toor
Kali Linux leverages the Gnome graphical interface and comes with hundreds of preinstalled security tools.
On the other hand, Kali Lite uses the XFCE graphical interface and assumes you will install the tools you want using apt.
Yes! Kali Linux armhf images are available for Raspberry Pi 2 & 3 boards. Kali also runs on several other SBCs, Android Tablets, Chromebooks, and a cool little device called a Gemini PDA. Find a link to the ARM images in the reference section below.
Yes, Kali Linux is popular for it’s LiveCD environment. You can boot your computer from a Kali Linux CD or bootable USB drive and use all of the tools without installing the operating system.
You will need to use a supported USB wireless adapter which can be made available as a hardware pass through device to the VM.
1GB of RAM (2GB Recommend), 20GB of free space.
A full installation of Kali Linux consumes ~12GB of hard drive space. Kali Lite installed without additional tools consumes just under 3.2GB of hard drive space.
“It was developed by Mati Aharoni and Devon Kearns of Offensive Security through the rewrite of BackTrack, their previous information security testing Linux distribution based on Knoppix.” — from Wikipedia
Kali Linux Training Resources
- Kali Linux Revealed – A free online course from Offensive Security.
- Metasploit Unleashed – A free online ethical hacking course from Offensive Security.
- Overthewire Wargames – A virtual internet simulation that you can hack!
References
- Kali Linux Official Website
- Oracle VirtualBox
- Offensive Security – The company that created Kali
- Offensive Security on Vagrant Cloud
- Kali Linux Wikipedia Page
- Announcing Kali for Vagrant
- tools.kali.org – A complete list of all software tools.
- Kali Linux ARM Images – Kali Images for Raspberry Pi and other ARM based devices.
- Kali Docs: Installation Screens
