 & connect iOS devices (iPhone/iPad)")
How to configure a MikroTik IKEv2 VPN (RouterOS v6) & connect iOS devices (iPhone/iPad)
This tutorial is based on RouterOS v6, this configuration does not work on RouterOS v7
So you want a better Remote Access VPN option for MikroTik?
Lets look at what it takes to setup a IKEv2 VPN that works with iOS Devices. For the record, the configuration should also support Mac OSX VPN clients but I have not tested it. Oh, & I tested this configuration on an iPhone X running iOS 11.
Create Self-Signed Certificates in RouterOS
This procedure is really easier to do from the cli so open a terminal window in winbox and follow along.
Generate a Self-Signed CA certificate
/certificate add name=my.ca common-name=my.ca key-usage=key-cert-sign,crl-sign trusted=yes
/certificate sign my.ca
Generate a certificate for the vpn server (the router), sign it and trust it.
/certificate add name=vpn.server common-name=vpn.server
/certificate sign vpn.server ca=my.ca

# Paste this line separately
/certificate set trusted=yes vpn.server
Generate a certificate for the vpn client (your phone) and sign it.
/certificate add name=vpn.client common-name=vpn.client
/certificate sign vpn.client ca=my.ca

# Paste this line separately
/certificate set trusted=yes vpn.client
Export the CA certificate to a file
/certificate export
Your exported CA certificate is now in Files with the filename cert_export_my.ca.crt
Export the Client to a file w/ a Passphrase (required for iOS import)
/certificate export-certificate vpn.client export-passphrase=12345678 type=pkcs12
Your exported client key pair is now in Files with the filename cert_export_vpn.client.p12
Note: If you were curious, pkcs12 is a bundle that contains the private key and signed certificate. This is a file format that iOS understands.

Configure IKEv2 in RouterOS
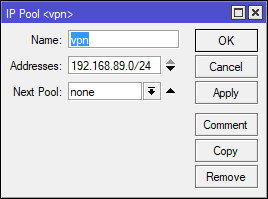
Create an IP Pool
Check first you may already have one if you have an existing PPTP, LT2P, or SSTP VPN setup. You can reuse the existing pool or create a new one just for IKEv2 VPN clients.
Here is the IP pool I added…
/ip pool add name=vpn ranges=192.168.89.0/24
Create a new IPSec Mode Config
This is the glue that tells the IPSec Peer what IP pool to use.
/ip ipsec mode-config
add address-pool=vpn name=cfg1 static-dns=8.8.8.8 system-dns=no

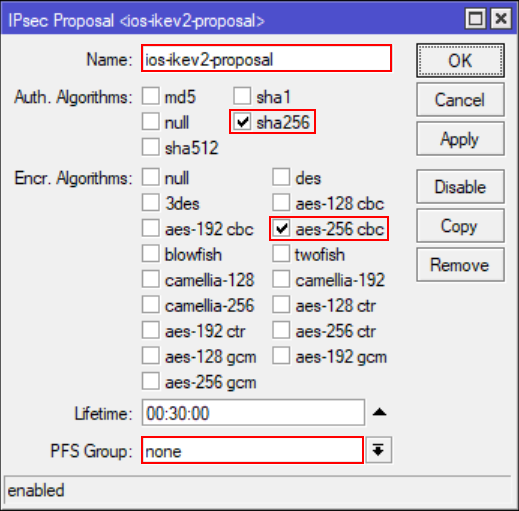
Create an IPSec Proposal
/ip ipsec proposal add auth-algorithms=sha256 enc-algorithms=aes-256-cbc name=ios-ikev2-proposal pfs-group=none
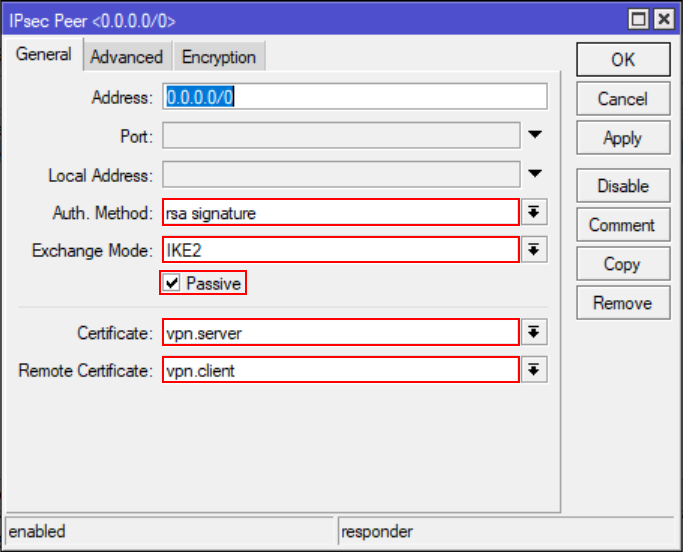
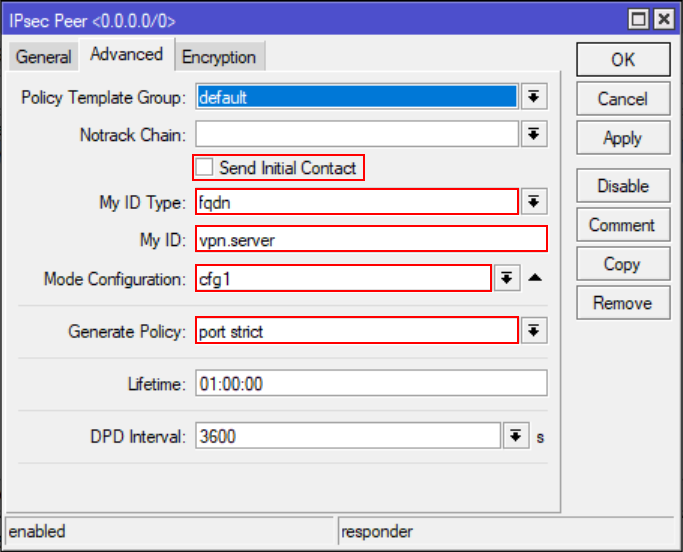
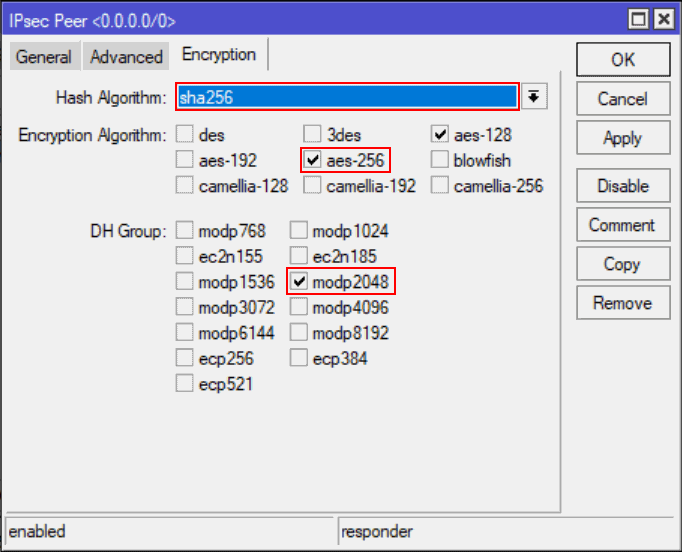
Create an IPSec Peer
/ip ipsec peer
add address=0.0.0.0/0 auth-method=rsa-signature certificate=server dh-group=modp2048 dpd-interval=1h \
    enc-algorithm=aes-256,aes-128 exchange-mode=ike2 generate-policy=port-strict hash-algorithm=sha256 \
    lifetime=1h mode-config=cfg1 my-id=fqdn:vpn.server passive=yes remote-certificate=vpn.client \
    send-initial-contact=no
Wow, that’s one big nasty RoS command, here are some screenshots to compare.
Install Certificates on the phone
We need to install both the Client certificate and the CA certificate on your device.
For this process we are going to need a little helper(python) to get the certifications on the iPhone. You see, iOS will let you use Safari to install certificates from a website. We can copy down the two required certificate files and use python to run a quick and fast webserver.
- Copy the .crt,.p12 files to a directory on your pc.In winbox, just click Files and drag them out to a folder on your PC. You can also grab the files via FTP.
- Open a command prompt and CD to the directory.
- Issue the following command to start serving the files over http
python -m http.server --cgi 8000 - From your phone navigate to http://{PCsIPADDR}:8000/
- Click on and install each certificate entering the CA passphrase when prompted.
Note: Upon installation of each certificate you will first be asked to enter your phone’s unlock code.
Alternative Certificate Installation Method
Don’t have or want to install python? You can also email these certificates to yourself as attachments and install them from the mail client on your phone.
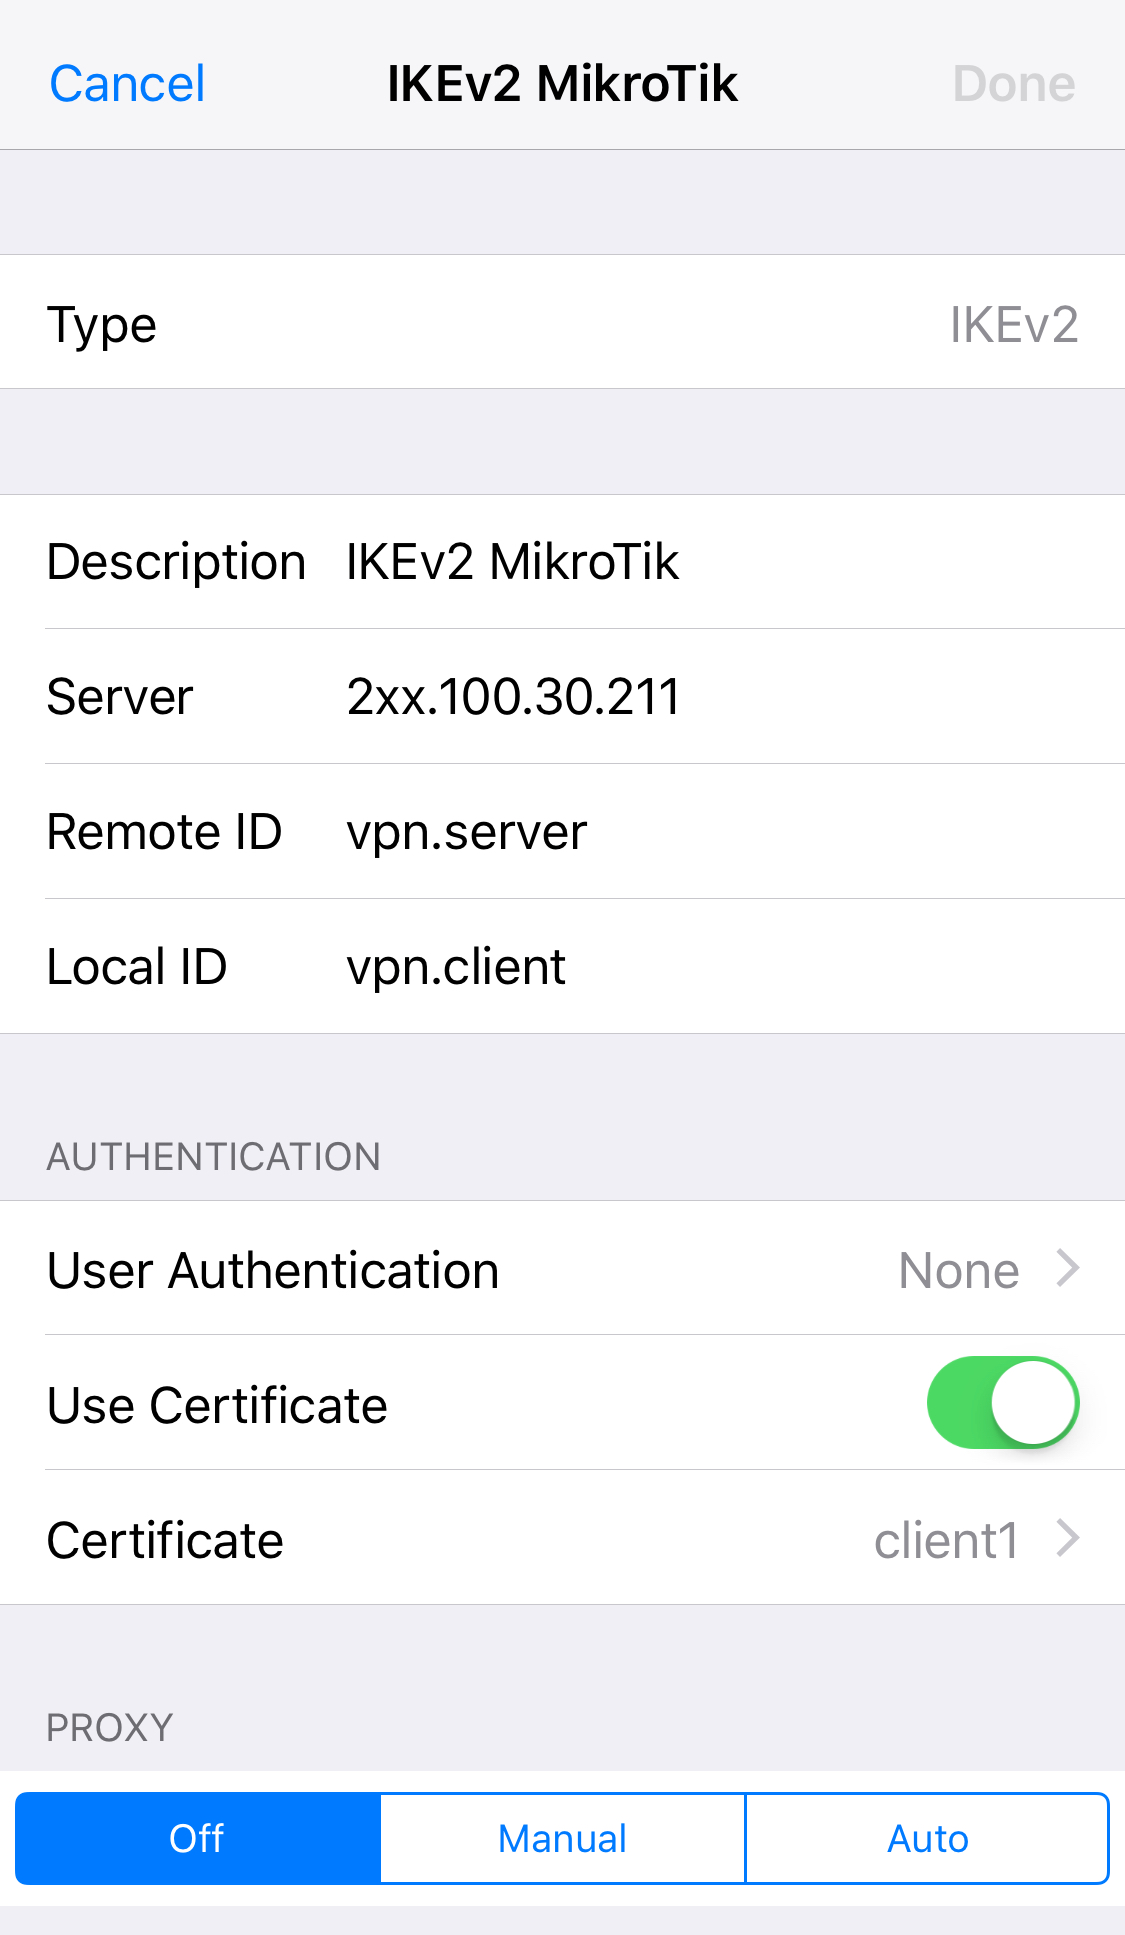
Create a new VPN profile in iOS
- Open Setting | VPN
- Tap Add VPN Configuration…
- Choose type IKEv2
- Enter the remaining settings as followsDescription: IKEv2 MikroTikServer: {external ip of router}Remote ID: vpn.server (cn from server certificate)Local ID: vpn.client (cn from client certificate)User Authentication: None (trust me that’s the right one)
Use Certificate: On
Certificate: Choose the vpn.client certificate from the list
- Tap Done
The steps are almost identical on an iPad, I’m sure you will figure it out ;).
Testing out your shiny new IKEv2 VPN
- Tap the Back arrow from the VPN settings screen.
- Tap on the newly created VPN profile and toggle the VPN on.
If all your stars align, you should see Connected
Browse over to http://whatsmyip.org to see that you are now coming from the IP of your VPN router.
That’s it, I how you enjoyed this step-to-step guide on configuring a MikroTik IKEv2 VPN that iOS devices can connect to and use. If you have questions or comments please take a moment to leave me a comment below.
Troubleshooting IKEv2 Connection Issues
If you are still reading this… then your VPN probably didn’t connect. First, take a deep breath and go over the steps above to verify your MikroTik config is correct. Don’t give up, I promise we will get through this!
I’ll throw out some common pitfalls and if that doesn’t help, we will look at some of the IPSec debug logging
Issue: VPN status just says Connecting… and then finally times out.
Resolution: Make sure you don’t have a blocking firewall rule on the input chain. If your input filewall ruleset is rather restrictive make sure you add these rules towards the top of your IP | Firewall | Filter Rules
TODO Add Rules
Issue: VPN Connects but I cannot pass any traffic or access any web pages
Resolution: Make sure your have NAT rule that masqurades traffic from the IP pool out the WAN interface. My NAT rule looks like this…
/ip firewall nat
add action=masquerade chain=srcnat out-interface=ether1
Also make sure you are passing your IKEv2 vpn clients a valid DNS server. See IPSec | Mode Configs
Issue: VPN Connects but after a short time it disconnects.
Resolution: This is most likely an issue with rekeying. Apple iOS/OSX require a specific set on algorothms and does not support pfs (unless you use provisoning profiles). Go back over the Configure IKEv2 in RouterOS section above paying close attention to IPSec Peer Encryption and IPSec Proposals.
References
- Andis Arins MUM presentation about configuring IKEv2
- MikroTik IPSec Manual Page
- MikroTik Certificates Manual Page

LinkRunner G2 is the ultimate network cable test tool
CAT5 Cable Tester, Measure Cable Length,
PoE Voltage, Network Connectivity, Switch Port ID
Optional Wireless & Fiber Optics Modules
Check Price on Amazon

65 Replies to “How to configure a MikroTik IKEv2 VPN (RouterOS v6) & connect iOS devices (iPhone/iPad)”
Hello. Excelente Post.
But dont work. I have a dude:
1- What is IPSEC POLICY Definition ?
I have this: /ip ipsec policy
set 0 dst-address=0.0.0.0/0 group=Group_VPN proposal=IKev2-Proposal \
src-address=0.0.0.0/0
you don’t need one, it will be generated automatically, just keep the default template.
make sure you have Generate Policy = port strict in your peer config
worked for me, thanks!
error
no policy found/generated
trying to configure on a clean 6.42.1, does not want to connect the long connecting then disconnecting. At the same time, everyone connects
trying to configure on a clean 6.42.1, does not want to connect the long connecting then disconnecting. At the same time, everyone connects via l2tp without a problem
Configured my iPad according to the instructions, connects and disconnects immediately, in the mikrotik logs-RSASIG verification failed, what to do ? Help me please
I’m getting RSASIG verification failed as well. Anyone figure it out?
It acquires an IP from the pool, but how should I connect to the router from device? How to set the router’s IP for this subnet?
Hello ! I have problem the configuration. The phone vpn profile connect to router, but about five second disconnect the vpn tunnel, the router log file say no error. Any idea?
Regards
Krisztian
VPN Connects but after a short time it disconnects. Your suggested resolution above, to pay a close attention to IPSec Peer Encryption and IPSec Proposals didn’t worked. I checked again an again all settings, but could not solve that issue.
log says:
peer authorized
12:52:54 acquired 192.168.89.2 adress for …., vpn.client
12:52:54 releasing address 192.168.89.2
12:52:54 killing ike2 SA
12:52:54 KA tree dump (in-use = 1)
12:52:54 LA removing this one
for a short moment I can see the vpn-client on remote peers tab (IP->IP sec)
IOS: 11.3 on IPhone6
Hi I’m having the same problem. If I connect internally via WiFi, the VPN works and I see that authentication succeeded. However if I come externally I get what you see, same messages, but no client authentication success. I checked the firewall rules and they appear correct, I can see the incoming connections.
Hi, thanks for your article – works like a charm! But, only one client can connect?! When a second client connects, the first client get kicked out. Is this right?
Regards, Michael
In my case vpn connects from iOS, i can access the router through the tunnel, but cannot access any website, like NAT isn’t working. I have the NAT rule.
check the default config firewall rule – specifially the one that says — drop – forward – WANiface
I can get the VPN to work on my LAN, but not from external IP’s. Do I need a firewall filter rule? I set my VPN LAN pool the same as my DHCP pool.
Hi,
Did all steps but after I want to connect it say disconnect in 2 seconds. I think I need to do something with FW. Can someone help me what should I write in FW rules that Mikrotik will accept IKEv2 connection?
Hi,
I am tray this confg and work fine (good job) but if i need use User Authentication user & pass
thanks for article!
How to add 2 more keys for macbook and windows pc?
Hi,
Can´t connect. I get an “EAP not configured” error in my log, followed by a “killing ike v2 …”. Any help would by appreciated
Same here on current router OS and iOS
me too recive this error
Same here too
You have to chose ‘None’ instead of ‘Certificate’ when creating the VPN connection in iOS. See https://forum.mikrotik.com/viewtopic.php?f=2&t=142913&p=703947#p703947
Thanks for the guide. I’m able to connect fine from the mobile phone (iOS).
The only issues I’m having are:
– DNS server settings are not assigned to the client, as a result it cannot resolve hosts to IPs,so I cannot access web pages for example. I can ping both internal and internet ip addresses though,so it does not appear to be a NAT issue.
– I can access internal network subnet and the internet, but not Mikrotik ip address itself. Does this need an explicit rule?
Thanks,
Yannis
when I enter this command /certificate export nothing shows up in the files. What am I doing wrong?
guide is a little.. eh. use this command..
/certificate export-certificate my.ca
hi
i have problem
when i want install Certifications (my.ca & vpn.client) on my iphone vpn.client install successfully but my.ca not and i see this message ” this attachment was removed ”
what should i do ???
Hi,
Great tutorial, finily managed to set up VPN on iPhone. Now i’m trying to use the same configuration on Windows but without success. Is this able to acchive with built in clien’t or you suggest some 3’th party tool?
Thx
Can you please update for RouterOS 6.44. The fields and setup have changed significantly making the presentation no longer as relevant.
Yes, I will look into what has changed in 6.44. Thanks
Hey.. this is a great post and I find that it’s easier to follow than the official one from Mikrotik wiki. Just one note.. whilst your post is written for IOS only, there’s only one minor change to the cert creation command that would allow Android VPN client (e.g. Strongswan VPN client) to connect successfully as well:
/certificate add name=vpn.server common-name=vpn.server subject-alt-name=DNS:vpn.server
Unlike IOS VPN client, Subject Alternate Name is needed to be present in the certificate by Strongswan VPN client on Android.
in iOS 12 (and maybe others) you need to install the CA certificate as well. Not just the .p12. (even tho the .p12 contains the CA, it doesn’t load properly and you get authentication failure messages).
that’s a great post. please have a look at the work around in 6.44, the article doesn’t work for this version.
I am also interested in seeing this setup and working for more recent versions of routeros. Thanks.
Tutorial is old and not working in recent RouterOS. It connects but no traffic passes in either LAN or internet. Firewall is OK and masq rule is set, but it doesn’t explain why it prevents to access same LAN. Also it assignes a ridiculous IP out of the pool (if pool set as 192.168.6.0/24) it assigns to the VPN client 192.168.6.0 which is illegal IP.
Hi,
I Get connection but then it drops. no error. just shows this->
13:42:08 ipsec,info killing ike2 SA: x.x.x.x[4500]-x.x.x.x[4500]
13:42:08 ipsec,info releasing address 10.59.10.21
13:42:55 ipsec,info new ike2 SA (R): x.x.x.x[500]-x.x.x.x[500]
13:42:55 ipsec,info,account peer authorized: x.x.x.x[4500]-x.x.x.x[4500]
13:42:55 ipsec,info acquired 10.59.10.21 address for x.x.x.x, vpn.client
13:45:20 ipsec,info killing ike2 SA: 102.x.x.x[4500]-102.x.x.x[4500]
13:45:20 ipsec,info releasing address 10.59.10.21
I come right, I got connected but need help with the /IP firewall filter. I need to be able to get on to my network to be able to access service.
Hi, i follow your step-by-step on mikrotik (RB2011UAS version 6.45.5) and iphone. when i try to connect the VPN, i always have a “user authentification failed”
Hi all! iOS 13 have a new certificate requirements (https://support.apple.com/en-us/HT210176). In particular (like for Android Strongswan client) “Subject Alt Name” field is needed to be filled:
/certificate add name=vpn.server common-name=vpn.server subject-alt-name=DNS:vpn.server
I am able to get clients connected on iOS 13.1.2, thanks to knowing the cert requirements, but connection drops after the ~8min re-key mark on iOS. Running ROS 6.45.6. I’ve double checked IPSec settings and they are consistent with the recommendations above.
I only got this working with routerOS 6.42.7 al versions after that don’t support this: /ip ipsec peer
add address=0.0.0.0/0 auth-method=rsa-signature certificate=server dh-group=modp2048 dpd-interval=1h \
enc-algorithm=aes-256,aes-128 exchange-mode=ike2 generate-policy=port-strict hash-algorithm=sha256 \
lifetime=1h mode-config=cfg1 my-id=fqdn:vpn.server passive=yes remote-certificate=vpn.client \
send-initial-contact=no
command i think because they have split this in different menusIs there somebody who can sort these commands? I tried using the GUI but i cannot get the right authentication method to work.
Ok, I exported the whole configuration which is working in RouterOS 6.45.6. Hope this helps:
/certificate add name=my.ca common-name=my.ca key-usage=key-cert-sign,crl-sign trusted=yes
/certificate sign my.ca
/certificate add name=vpn.server common-name=vpn.server subject-alt-name=DNS:vpn.server
/certificate sign vpn.server ca=my.ca
# Paste this line separately
/certificate set trusted=yes vpn.server
/certificate add name=vpn.client common-name=vpn.client
/certificate sign vpn.client ca=my.ca
# Paste this line separately
/certificate set trusted=yes vpn.client
/certificate export-certificate my.ca
/certificate export-certificate vpn.client export-passphrase=12345678 type=pkcs12
/ip pool add name=vpn ranges=192.168.89.0/24
/ip ipsec mode-config
add address-pool=vpn name=cfg1 static-dns=8.8.8.8 system-dns=no
/ip ipsec proposal add auth-algorithms=sha256 enc-algorithms=aes-256-cbc name=ios-ikev2-proposal pfs-group=none
/ip ipsec profile
add name=iOS hash-algorithm=sha256 enc-algorithm=aes-256,aes-128 dh-group=modp2048 lifetime=1h dpd-interval=1h
/ip ipsec peer
add address=0.0.0.0/0 exchange-mode=ike2 profile=iOS name=iPhone
/ip ipsec identity
add auth-method=digital-signature certificate=vpn.server generate-policy=port-strict match-by=certificate mode-config=cfg1 my-id=fqdn:vpn.server peer=iPhone remote-certificate=vpn.client
Good luck!
Mark,
Has this remained connected past the 8 min/480 sec mark? I’ll re-verify my config and compare to be certain that I have something equivalent.
Hi Andrew, a bit late.. My connection remains connected (and data traveling up and down) for as long as i keep the VPN up. Sometimes the connection stay connected but there no data going through the tunnel, i guess that has to do with an unstable 4g connetion on my iOS device, since there is no exact science on when the connection drop.
Hi! I found this answer to your question today by incident I thought I would share it with you. You should disable PFS because iOS/macos cannot rekey. More info on http://www.openradar.appspot.com/29821241
Also, you are only specifying cert usage for the CA, it would appear?
Re-checked everything and even matched this config, but the connection still drops at around 8mins no matter what. I have full connectivity otherwise and it works great within that timeframe. Any insights?
Andrew, did you check this? – Ios / macos all use aes-256 and sha256, dhgroup choice 14,
/ip ipsec peer
add address=0.0.0.0/0 auth-method=rsa-signature certificate=fullchain.pem_0 dh-group=modp2048 enc-algorithm=aes-256 exchange-mode=ike2 generate-policy=\
/ip ipsec proposal
set [ find default=yes ] auth-algorithms=sha256 enc-algorithms=aes-256-cbc pfs-group=none
Hi Martin,
After walking away for a while, I started trying again and it seems like iOS 13 clients now require a pfs group. I just used modp2048 for pfs and I’ve been able to keep a continuous connection since.
Just wanted to post back with information on this setup of mine. I’ve been able to fully implement IKEv2 VPN from home in addition to substantially upgraded security to iOS devices.
I was able to get some temporary access to a Mac Mini, which allowed me to create configuration profiles for my devices. With this, I was able to force AES-256-GCM on Child SA and DH groups 19, 20, 21 (settled on 20) — all of which are apparently supported by iOS 13.x now. The tighter security may not be ideal for many multiple tunnels, but works great for just a few clients. Very happy with the security and tunnel speed of setup, honestly.
I’ve read the comments and found out that there was no possibility to connect to devices at once with the router. You can bu you have to create a new certificate and identity for that client. The terminal commands are below:
/certificate add name=vpn2.client common-name=vpn2.client
/certificate sign vpn2.client ca=my.ca
# Paste this line separately
/certificate set trusted=yes vpn2.client
/certificate export-certificate vpn2.client export-passphrase=12345678 type=pkcs12
/ip ipsec identity
add auth-method=digital-signature certificate=vpn.server generate-policy=port-strict match-by=certificate mode-config=cfg1 my-id=fqdn:vpn.server peer=iPhone remote-certificate=vpn2.client
I have tested this on iPhone and iPad and work side by side.
Hi.
i´ve tried to configure the IKEv2 VPN between an CHR on stable 6.45.7 and my iPhone on Version 13.2.2
Connectin is established but i can´t connect to the router or a device behind it. Still no icmp http or something else.
Do you have an idea?
Hi Markus, i had the same issue, it might have something to do with the firewall rules.
hello everybody,
thanks for the great tutorial. unfortunately this does not work with IOS 13 and Mikrotik OS 6.46.
Would it be possible to update the howto?
only the best…
i´m getting error on this command in terminal?
Terminal code:
“/ip ipsec peer
add address=0.0.0.0/0 auth-method=rsa-signature certificate=server dh-group=modp2048 dpd-interval=1h \
enc-algorithm=aes-256,aes-128 exchange-mode=ike2 generate-policy=port-strict hash-algorithm=sha256 \
lifetime=1h mode-config=cfg1 my-id=fqdn:vpn.server passive=yes remote-certificate=vpn.client \
send-initial-contact=no”
Error: /ip ipsec psec peer
bad command name psec (line 1 column 11)
[admin@hidden] >> radius add address==0.0.0.0/0 auth-method=rsa-signa
ture certificate=server dh-group=modp2048 dpd-interval=1h \
syntax error (line 1 column 21)
[admin@hidden] >> export nc-algorithm=aes-256,aes-128 exchange-mod
e=ike2 generate-policy=port-strict hash-algorithm=sha256 \
expected end of command (line 1 column 12)
[admin@hidden] >> log info fetime=1h mode-config=cfg1 my-id=fqdn:v
pn.server passive=yes remote-certificate=vpn.client \
expected end of command (line 1 column 20)
[admin@hidden] >> set name=d-initial-contact=no
syntax error (line 1 column 14)
[admin@hidden] >>
Routerboard v. 6.44.5
Thanks
The double >> prompt is a clue to me that the terminal sessions is in a confused state. I’ve seen this happen before and copy paste will not work correctly. Try to close and open a new terminal session then paste again.
I have the same issue, and the problem is not in terminal
@MikroTik] /ip ipsec peer> add address=0.0.0.0/0 auth-method=rsa-signature certificate=server dh-group=modp2048 dpd-interval=1h enc-algorithm=aes-256,aes-128 exchange-mode=ike2 generate-policy=port-strict hash-algorithm=sha256 lifetime=1h mode-config=cfg1 my-id=fqdn:vpn.server passive=yes remote-certificate=vpn.client send-initial-contact=no
expected end of command (line 1 column 23)
Keys to success (pun intended).
– Need two certs on Iphone: the client cert and the base cert (.ca) but now done separately.
– Require subj alter name format for server and client certs – DNS:actual name (and not common name)
Path to Success.
MIKROTIK
(1) Create Base .ca Certificate – any name will do for example mycert.ca
I entered in the two letter country designator and all the fields down to ‘Unit’ but not sure that is necessary.
Select the number of days you wish the cert to be valid (800 days or less).
Key Usage required is only two keys – ‘key cert sign’ and ‘crl sign’
Self Sign it. The only entry in this menu will be the name in the top box, hit start and wait for it to stop. There will be nothing appearing in the ISSUER box, this is ok!
Hit Apply, OK, done!
(2) Export this certificate in PEM format and use at least an 8 digit passphrase 87654321 for example. When you do it exports both a key and a crt (certificate). You only need the crt export file.
(3) Create vpn server certificate – any name will do but ensure it is not the same as the common name (vpn.server) – so for ex. myvpn.server
Select the number of days you wish the cert to be valid (800 days or less)
Enter in the common name ‘vpn.server’
Enter in the subj alternate name – DNS:myvpn.server (note you have to delete the two colons ‘:: ‘ that already exists in the name block
Key Usage required is only two keys – tls client and tls server
Sign the certificate using the name of the certificate in the top box, myvpn.server
and for the CA, the mycert.ca choice .
Hit start and when done, hit close, enter a check mark in the Trusted box that is now at the bottom of the screen and then hit apply and ok – done!
(4) Create vpn client certificate – any name will do but ensure its not the same as the common name (vpn.client) – so for ex. myvpn.client
Select the number of days you wish the cert to be valid (800 days or less)
Enter in the common name ‘vpn.client’
Enter in the subj alternate name – DNS:myvpn.client (note you have to delete the two colons ‘:: ‘ that already exists in the name block
Key Usage required is only two keys – tls client and tls server
Sign the certificate using the name of the certificate in the top box, myvpn.client
and for the CA, the mycert.ca choice .
Hit start and when done, hit close, enter a checkmark in the Trusted box that is now at the bottom of the screen and then hit apply and ok – done!
NOTE: for the server and client certificates, the alternate DNS name CANNOT be the same as the common name – thus for ex. DNS:myvpn.server (and not DNS:vpn.server)
(5) Export the myvpn.client certificate and use the PK format and at least an 8 digit passphrase 87654321 for example.
IPHONE
Three locations on the phone are used:
a. Settings-General-Profiles (Profiles appears directly below VPN)
b. Settings-General-About – Trusted Certificates (last entry on the list)
c. Settings-General-VPN
(6) Move the mycert.ca certificate to the iphone and install -for me it auto drops into Profiles.
Go to Profiles and click on the certificate (it has a generic name at this point can’t remember)
It asks for the iphone password, and then you hit install and then it asks for your digit passphrase 87654321 and hit install and done etc…….
You should see it successfully install in profiles with a green check mark for verified and displaying the correct name now (not the generic name) – mycert.ca
(7) Go to Trusted Certificates, your certificate should also be there mycert.ca and have an enable selection available. Enable the cert!
(8) Move the myvpn.client certificate to the iphone and install – for me it auto drops into Profiles.
Go to Profiles and click on the certificate (it has a generic name at this point can’t remember)
It asks for the iphone password, and then you hit install and then it asks for your digit passphrase 87654321 and hit install and done etc…….
You should see it successfully install in profiles with a green check mark for verified and displaying the correct name now (not the above generic name) but I believe
the common name – vpn.client
(9) Go to Iphone VPN location and add a new VPN configuration.
Type- IKEv2
Description – not critical I put something like IKEv2MTServer
Server – MT dydns name ………………mynetname.net
Remote ID – myvpn.server
Local ID – myvpn.client
Authentication – Use Certificate
Under Certificate – Select the option that reflects your certificate ( I believe here apple just used the common name – vpn.client)
When trying to open the CA cert I just get a message that the cert is broken and cannot be used.
“VPN Connection: The VPN server did not respond” – not working for iOS 13.3.1 and Router Mikrotik 6.48.1
Thank you for your time in sharing knowledge to make better my use of MikroTik stuff and others too. Much appreciated. I have some relatives who live in Houston so I ‘ve been to a few places in Texas a few times now. Good on you.
Thanks again.
Peter,
I am happy to help, thank you for the feedback!
Is this setting still work with RouterOS6.47.4?
Thanks
Can you please update for routeros v7?