")
MikroTik Tutorial: How to enable DNS over HTTPS (DoH)
In this MikroTik Tutorial I will show you how to configure DNS over HTTPS on your MikroTik router using either Cloudflare DNS servers or Google DNS servers.
The latest stable version of RouterOS 6.47 adds support for DNS over HTTPS or DoH. DoH is a protocol for performing remote DNS over HTTPS protocol. It is similar to DoT (DNS over TLS) but not exactly the same.
DNS Queries over HTTPS (DoH) is an accept IETF standard RFC8484.
DNS over HTTPS (DoH) is a protocol for performing remote Domain Name System (DNS) resolution via the HTTPS protocol. A goal of the method is to increase user privacy and security by preventing eavesdropping and manipulation of DNS data by man-in-the-middle attacks[1] by using the HTTPS protocol to encrypt the data between the DoH client and the DoH-based DNS resolver.
Wikipedia DoH page
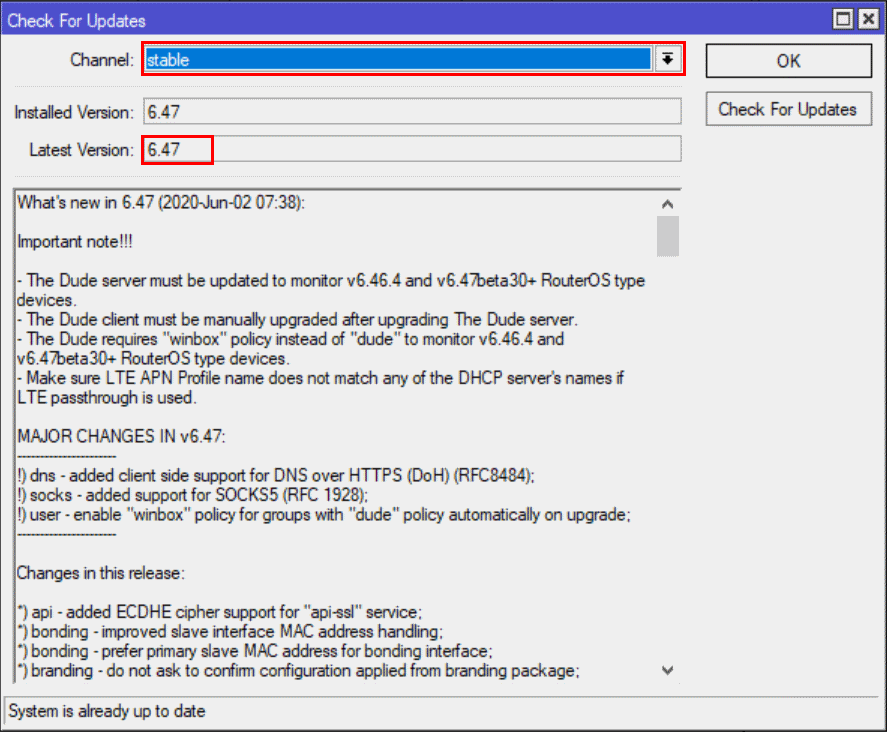
UPDATE: RouterOS v6.47 was released to the stable channel on June 2nd 2020 with DNS over HTTPS support. I used a RB4011 router running RouterOS v6.47beta60 during testing. You will see 6.47beta60 referenced in the screenshot below but I recommend using the stable channel.
Steps to Configure DNS over HTTPS on a MikroTik Router
Time needed: 2 minutes
- Upgrade to RouterOS v6.47 available in the stable channel.
System | Packages | Check for Updates

- Download and Import root certificates
/tool fetch url=https://curl.haxx.se/ca/cacert.pem
/certificate import file-name=cacert.pem passphrase=””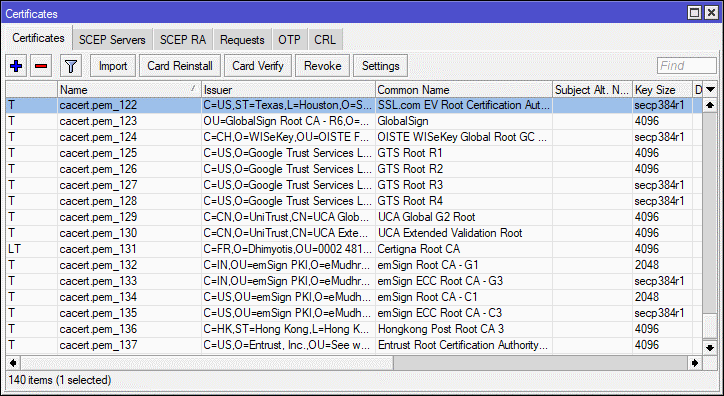

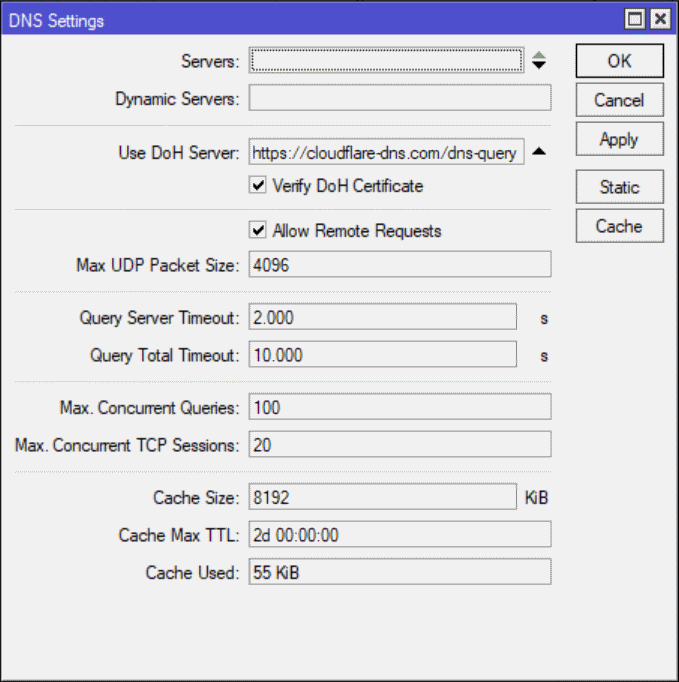
- Remove DNS Servers
In winbox open IP | DNS, remove existing Servers
- Add a static DNS entry for the DoH hostname.
IP | DNS | Static | +
Add 2 Static DNS Entries for cloudflare-dns.com to Address: 104.16.248.249 and 104.16.249.249.
If you plan on using Google add dns.google pointing to 8.8.8.8 and 8.8.4.4.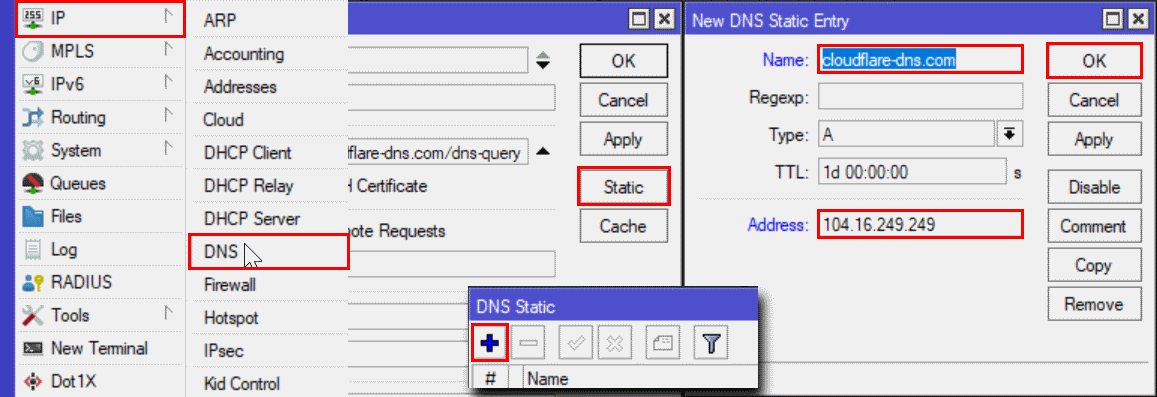

- Add providers url to “Use DoH Server” and check the box “Verify DoH Certificate”
For cloudflare I added https://cloudflare-dns.com/dns-query

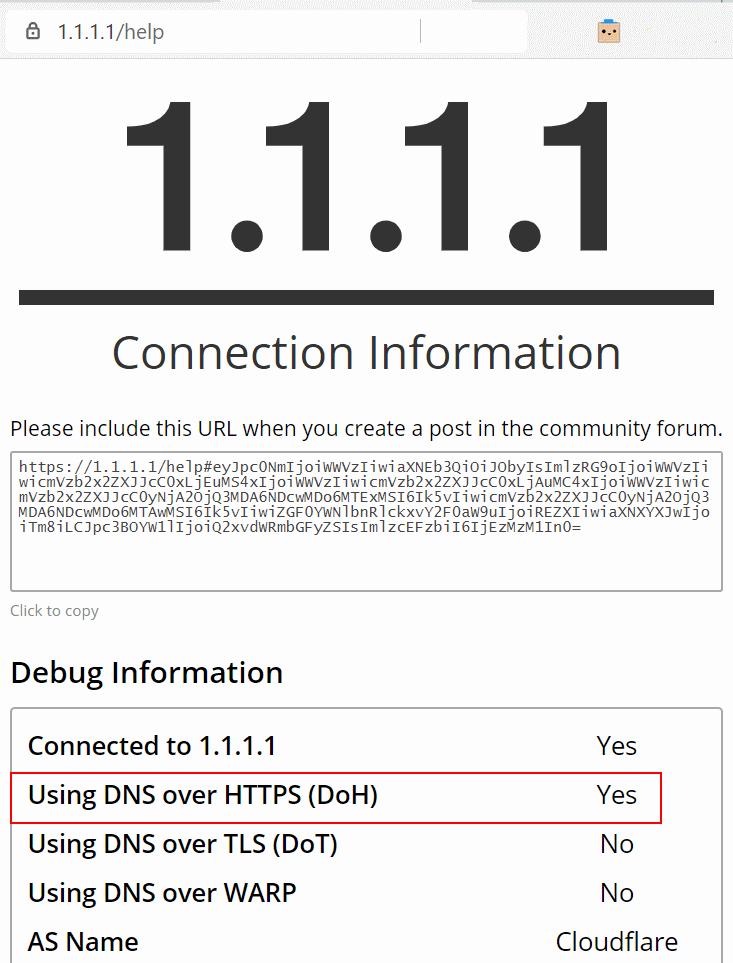
Verify that DoH is enabled and working
Cloudflare has provided a simple web status page at https://1.1.1.1/help to verify that you have configured DNS over HTTPS properly.
Configure Cloudflare DNS over HTTPS resolver
The resolver url for Cloudflare is https://cloudflare-dns.com/dns-query as show in the screenshot above.
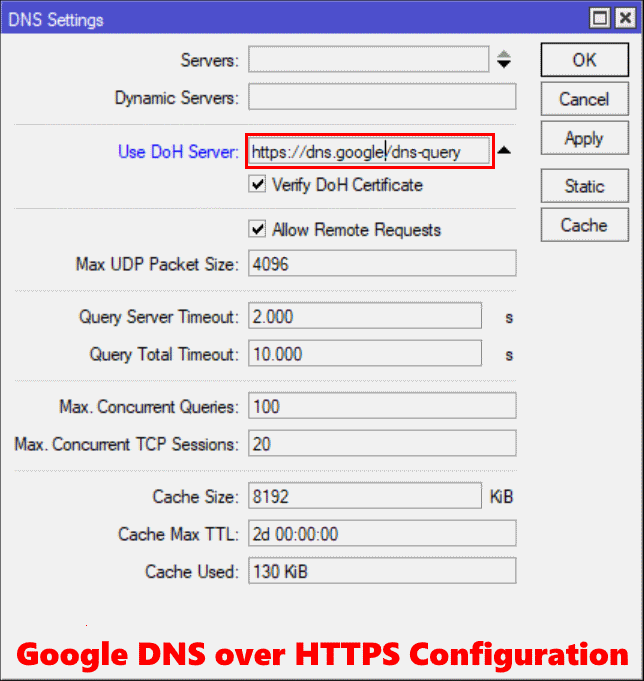
Configure Google’s DNS over HTTPS resolver
The resolver url for Google is https://dns.google/dns-query as show in the screenshot below.
Error Messages & Troubleshooting
dns, error DoH server connection error: SSL: handshake failed: unable to get local issuer certificate (6)
This error is a result of not having root certificates installed to validate the https certificate of the DNS server url.
dns, error DoH server connection error: resolving error
This error is a result of entering only an IP address in the Use DoH Server field. It should be entered as a https:// url.
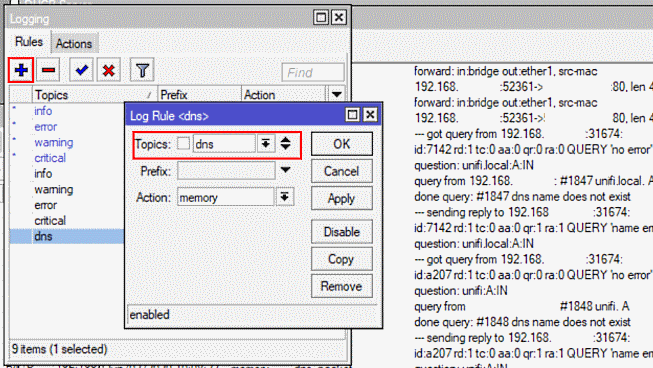
Enable DNS debug logging
Another way to see what is going on with dns queries on your MikroTik router is to enable DNS logging.
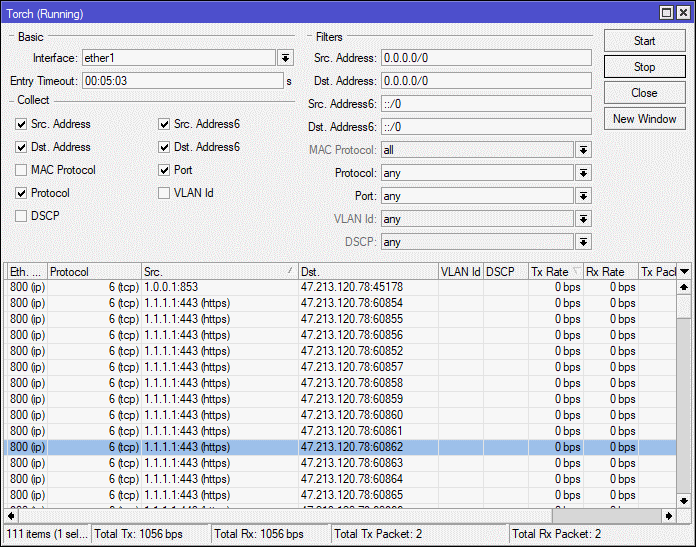
Verify DoH is working with Torch
To verify that DoH is configured and working run torch on your WAN interface and verify you see no udp or tcp connections to DNS port 53. In my configuration to cloudflare I can see multiple https connection to 1.1.1.1.
Now you have DNS over HTTPS configured on your MikroTik Router. I hope you have enjoyed this howto article, you can find many more MikroTik Tutorials here.
Did this work for you? Let me know in the comments section below.
More MikroTik Articles
- MikroTik FAQ – Ask Me Anything
- Reboot a MikroTik router with SNMP set (Python Script)
- MikroTik Tutorial: How to recover RouterOS passwords from a backup file
- MikroTik Tutorial: show mac address table
- The Perfect MikroTik Config Restore Script
- Mikrotik Tutorial: How to configure persistent logging
- MikroTik Script: Router Rebooted Script
- MikroTik Tutorial: Firewall ruleset for IPsec whitelisting
- Custom Device Labels in “The Dude” nms
- MikroTik Script: Authentication Logging w/ Email Reports

61 Replies to “MikroTik Tutorial: How to enable DNS over HTTPS (DoH)”
Worked first time. Only issue was my typing. Thank you!
thanks for the feedback!
not work, nextdns always error connecting, it says “doh server connection error: resolving error” so i decide to set it DNS over tls, and work charm via vps
I assume you are talking about nextdns.io? I just tested and it works fine.
URL is https://dns.nextdns.io/dns-query
yeah its work but, how about configuration inside nextdns link over https? i test it and mikrotik log always says “DoH server connection error, resolving error. “, about 1 minutes after apply dns. just test it with your config inside nextdns. and see what wrong with that
You were able to get it to work with the FQDN? I had to use the resolved IP + my configuration url to get it to work with NextDNS.
you need to set static DNS record that evaluates your DOH server; e.g. I use https://cloudflare-dns.com/dns-query, thus I needed to set static DNS record cloudflare-dns.com => 1.1.1.1
Mikrotik does not know what IP address to use for cloudflare-dns.com..
I found a solution to this: If you leave at least one regular DNS Server IP in the DNS configuration, rOS will use it to perform a regular lookup on the configured DoH FQDN, then switches everything after that to DoH. This also seems to fix the “DoH server connection error: resolving error” message in the logs.
Thank you, this is also a viable option! In my testing, if DoH resolution fails it does not fallback to tradition DNS queries (Which is a good thing). It appears to only use the specified (traditional) name server to resolve the hostname in the DoH url.
Thank you, I have updated the instructions based on your feedback.
https://1.1.1.1/dns-query
Thank you for great tutorial!
I think that not all root certificates are needed. If you go to “https://1.1.1.1/” it is issued for “cloudflare-dns.com”
– That is issued by “DigiCert ECC Secure Server CA”
– And it is issued by “DigiCert”
– Would it be possible to share tutorial to import just required certificate?
Digicert certificates can be found at https://www.digicert.com/digicert-root-certificates.htm
To download Google related certificates visit https://pki.goog/
Thank you for great starting point. I have done it this way:
1. First get certs from the source
openssl s_client -connect 1.1.1.1:443 -showcerts
2. Copy BEGIN CERTIFICATE section, save it to TXT, rename to CRT and double click
3. Do not import it on Windows. Go to Certification Path tab.
Select topmost(root) certificate and click View Certificate – Details tab – Select Serial number. Copy and paste Serial number to Notepad. Add double dots to SN.
4. Find SN on https://www.digicert.com/digicert-root-certificates.htm and copy link from “Download PEM”
5. On router use this link for /tool fetch url= and Import it
6. Repeat from 3 and download second(intermediate) certificate.
Worked perfectly, is it possible to use cloudflare and google DoH? Does this work for ipv6 too? Thanks, Tom!
I do not see a way that you can add a second provider but it may be possible to monitor and swap out providers with MikroTik Scripting.
I have not tested DoH over IPv6 but I would also love to know the answer.
Google DoH does not work via IP addr, it’s rejecting.
Use FQDN in conjunction with DNS record instead.
Thank you, you are correct. I have updated the article based on your feedback.
what do you mean, can u explaine more ?
For Cloudflare you can use this url for DoH settings: https://1.1.1.1/dns-query
with DigiCert Global Root CA certificate (valid till Nov 2031). No static entry required.
Thanks, that is correct. Probably a better choice.
And you can fetch the DigiCert Global Root CA certificate from here: https://cacerts.digicert.com/DigiCertGlobalRootCA.crt.pem
Yes, you right, but my RB750Gr3 had a load of up to 80% CPU with this certificate. With certificate which are given in article work fine, 1-3% CPU load. Really not understand why.
Can you resolve this problem? I use TB951G-2HnD and I have the same problem.
really its gonna valid till nov 2031 ? some peopel say until 2021 ? which one is right
DigiCert Global Root CA: Valid until: 10/Nov/2031
Hello, thank you for this tutorial. Everything is working nicely, but after rebooting router, DNS settings DOH is lost…my hw is hAP ac2.
I would also add that “Allow Remote Requests” should be disabled for security reasons.
– But in this case it must be enabled, otherwise only router itself will be able to use DoH.
– Solution might be to firewall port 53(DNS) on input chain from WAN port.
– Let me know if you know better solution.
ip firewall filter add action=drop chain=input dst-port=53 protocol=udp
ip firewall filter add action=drop chain=input dst-port=53 protocol=tcp
Better is allow for input chain only what you need and reject (or drop) everything else:
add action=accept chain=input comment=”Accept established, related” connection-state=established,related
add action=accept chain=input comment=”Accept all from LAN” in-interface-list=LAN
add action=accept chain=input comment=”Accept ICMP” protocol=icmp
add action=reject chain=input comment=”Reject everything else” reject-with=icmp-admin-prohibited
Simple DoH setup:
/tool fetch url=https://cacerts.digicert.com/DigiCertGlobalRootCA.crt.pem
/certificate import file-name=DigiCertGlobalRootCA.crt.pem passphrase=””
/ip dns set use-doh-server=https://1.1.1.1/dns-query verify-doh-cert=yes
Thank you. This works well for me.
i have many UDP connection but i think something incorrect
https://take.ms/lGqWP8 – screenshot
Regarding DigiCert Global Root CA, you can also just export it from 1.1.1.1 website. Any website will have the certification path and all the certs in it anyway.
are there IPv6 addresses for cloudflare-dns.com available? I’d like to have IPv4 and IPv6 available if possible
Thank you
had issue in log
DoH Server Connection error : remote disconnected while in http exchange
is there any solution of this ?
same as me , any help ?
Works great without any error thanks a lot
sometimes “DoH server connection error, idle time out – connecting” after a few hour so i cant connect internet for 1-3 seconds. how to solve this thanks
how long we can use this certificate before it expire ?
and how to update it if its gonna expire ?
Apparently you can use it until it expire (e.g. DigiCert Global Root CA for 1.1.1.1 is valid until: 10/Nov/2031). Then you import new certificate with new expiry date.
I tried with the instruction but it didn’t work for me. Not sure what went wrong. I tested it remotely by creating PPTP remote user. When I torch on to that PPTP interface I found DNS request are hitting on 53 port. Any advice?
i got this error: DoH server connection error: SSL: handshake failed: unable to get certificate CRL (6) i already installed the certifitate, no luck
same happen on me always getting error
Just to throw in that there are “family friendly” options also – for info:https://developers.cloudflare.com/1.1.1.1/1.1.1.1-for-families/
https://1.1.1.2/dns-query
I am using google DoH. But, it’s giving me errors sometimes DoH server connection error: connection timeout. The same thing happened with cloudflare.
I cannot reproduce this error but I would suggest you increase Mac Concurrent Queries and Max Concurrent TCP Sessions under IP | DNS settings and monitor. Let everyone know if that works.
Mac Concurrent Queries and Max Concurrent TCP Sessions are raised to 150 & 30 respectively. Still, the problem persists.
https://drive.google.com/file/d/1cvpv1zII7vnrwU-BS3-DJ8J988BwwFP_/view?usp=sharing
https://drive.google.com/file/d/192nSOSR6-fQUjNa-QDuJHHKveQTqP8iF/view?usp=sharing
Seems like without any modification it’s working after a couple of reboots and dns flash. Will wait for the next power failure to occur and see what happens. Thank you for replying.
Dear Concern,
I have successfully configured the system. It is showing me Verify that DoH is enabled and working. When I am torching WAN interface it is not showing me 1.1.1.1:443(http) rather showing me 1.1.1.1:53(dns). I dont know why it is happening. Is it any config error? Please let me know what to do if I want to solve the issue.
Sir
Can you provide me detailed Configuration for certificate for Google DNS
Dear JC ,Your tutorial is fantastic.It was very easy to setup. I have configured IPV4 and IPV6 static DNS of Cloudfare and rest as per your document. IPv4 is working fine but I have issue with IPV6 DNS resolution.I am getting IPv6 address but If i ping any ipv6 domain i am getting Error,so please help.
[admin@DOH DNS Server] > ping 2001:4860:4860::8888
SEQ HOST SIZE TTL TIME STATUS
0 2001:4860:4860::8888 56 119 57ms echo reply
1 2001:4860:4860::8888 56 119 39ms echo reply
2 2001:4860:4860::8888 56 119 44ms echo reply
sent=3 received=3 packet-loss=0% min-rtt=39ms avg-rtt=46ms max-rtt=57ms
[admin@DOH DNS Server] > ping v6.facebook.com
invalid value for argument address:
invalid value of mac-address, mac address required
invalid value for argument ipv6-address
while resolving ip-address: name does not exist
Thanks, worked from first attempt with Google.
I setup on the DHCP the router as only DNS server, but the android phones use 8.8.8.8 as DNS server. You can solve this problem in IPv4: https://wiki.mikrotik.com/wiki/Force_users_to_use_specified_DNS_server
How can I solve this in IPv6?
Thanks for the article. As a father I wanted to take advantage of the family filtering. I used the following setup:
/tool fetch url=”https://cacerts.digicert.com/DigiCertGlobalRootCA.crt.pem”
/certificate import file-name=DigiCertGlobalRootCA.crt.pem
/ip dns static add address=104.16.248.249 regexp=”.+\\.cloudflare-dns\\.com” type=A
/ip dns static add address=104.16.249.249 regexp=”.+\\.cloudflare-dns\\.com” type=A
/ip dns set allow-remote-requests=yes max-concurrent-queries=200 use-doh-server=https://family.cloudflare-dns.com/dns-query verify-doh-cert=yes
The static DNS entries use regex to match any subdomain of cloudflare-dns.com. You can then use the following URL’s depending on the filtering requirements you need:
https://cloudflare-dns.com/dns-query = 1.1.1.1 = Standard
https://security.cloudflare-dns.com/dns-query = 1.1.1.2 = No Malware
https://family.cloudflare-dns.com/dns-query = 1.1.1.3 = No Malware + No Adult Content
The URL’s can be found here: https://developers.cloudflare.com/1.1.1.1/1.1.1.1-for-families/setup-instructions/dns-over-https
update
/tool fetch url=https://curl.se/ca/cacert.pem
This. The other URL presents a 301 redirect for the aforementioned domain above.
Works like a charm! Many thanks. :)
Just want to thank you for this clear step by step instructions. Working @ first try with Mikrotik hEX RB750Gr3
I want to first use a local dns server as a dns black hole blocking tracking and some advertisements and all adult websites, including pornography and gambling. Then perform DNS over HTTPS so that only the provider of my DoH can see my traffic. Can this be done?